Why does not print page numbers in the Word. Inserting page numbers on sheets
For long printouts, you'll probably want to add page numbers to help keep them in order. This technique describes the possibilities of pagination.
Using basic pagination
To add page numbering, follow these steps:
- Select View Book View Modes Page Layout to enter page layout mode. Note that each page has a top and footer s at the top and bottom. Each header and footer consists of three sections: left, middle, and right. Be sure to keep an eye on this, especially if you are interested in registering a ZAO in Moscow.
- Click in the area of any header or footer where you want to add a page number.
- Select Constructor Header and footer elements Page number. Excel will add a code representing the page number.
- Click on any cell of the sheet to see the actual page numbers.
In step 3, the code that Excel adds is actually just inserting a number. You can add text to the pagination code. For example - if you want your page numbers to read Page 3, type Page (with a space at the end) before the code. This type of header or footer looks like this: Page &[Page] .
You may prefer to enable and total pages so that the numbering looks like this: Page 3 of 20. In step 3, select Constructor Header and footer elements Number of pages by adding this to the code. In addition, you must enter the word from. The completed code looks like this: Page &[Page] of &[Pages] .
Changing the first page number
If your printout is part of a larger report, you can start page numbering from a number other than 1. To do this, follow these steps.
- Select File Print, and Excel displays the print options in Backstage view.
- Click the Page Setup link to open the Page Setup dialog box.
- In the window Page settings go to tab Page.
- Enter the first page number in the First Page Number field.
If you specify a start page number other than 1, you probably don't want to use &[Pages] in your header or footer. Otherwise, you may see text like Page 18 of 3.
If you need to number the pages when printing a sheet Microsoft Excel, you can insert page numbers in headers or footers. The added page numbers do not appear on the sheet in normal view - they only appear in Layout View and on printed pages.
Note:: The screenshots in this article were taken in Excel 2016. If you're using a different version, it might have a slightly different interface, but unless otherwise noted, the functionality is the same.
Page numbering of one sheet
Pagination of multiple sheets
You can number pages on several sheets of a book using the dialog box Page settings. For example, if a book has two sheets of two pages each, the pages of the first sheet will be numbered as 1st and 2nd, and the pages of the second sheet will be numbered the same way.
Advice: In order to sequentially number the pages on all sheets of the book, it is necessary to change the number on each of the sheets from which the numbering of its pages begins. See the article for more information.
Click the sheets or chart sheets to which you want to add page numbers.
|
To highlight |
Do the following |
|
One leaf |
|
|
Multiple adjacent sheets |
|
|
Multiple non-contiguous sheets |
|
|
All pages of the book |
Select all sheets. |


Advice: [Group] Ungroup Sheets.
Selecting a different start page number
To number pages sequentially across all sheets in a book, first add page numbers to all sheets, and then use the procedure below to set the starting page number on each sheet. For example, if the book has two sheets, each of which is printed on two pages, use this procedure to start page numbering on the second sheet at 3.
Change the order of page numbering
By default, Excel numbers and prints pages from top to bottom and then from left to right, but this order can be changed so that pages are numbered and printed from left to right and then from top to bottom.
Removing pagination
Click the sheets (or chart sheets) on which you want to remove page numbers.
|
To highlight |
Do the following |
|
One leaf |
If the sheet tab you want is not visible, use the sheet scroll buttons to find it, and then click.
|
|
Multiple adjacent sheets |
Click the tab for the first sheet. Then, while holding down the SHIFT key, click the tab last leaf in the range you want to select. |
|
Multiple non-contiguous sheets |
Click the tab for the first sheet. Then, while holding down the CTRL key, click the tabs of the other sheets you want to select. |
|
All pages of the book |
Right-click the sheet tab and select from the context menu (context menu) the command Select all sheets. |
Advice: If multiple sheets are selected, the title bar at the top of the sheet will display [Group]. To deselect multiple worksheets, click any unselected sheet. If there are no unselected sheets, right-click the tab of the selected sheet and select the command from the context menu Ungroup Sheets.
additional information
You can always ask the Excel Tech Community a question, ask for help in the Answers community, or suggest a new feature or improvement on the website
How to number pages in excel is quite an interesting question. It occurs when we want to print our document directly from Excel. If we did this, for example, in Word, then there is a “Page Number” command in the “Insert” tab. Page numbering in Excel is slightly different from page numbering in Word.
To number the pages in Excel, first you need to insert a "Header and Footer" - this, in fact, will be our page numbers. And then we just set up our footer.
In order to insert a header and footer, find the Header and Footer tool on the "Insert" tab and click on it.
After that, select the “Right” position and click on the icon with the # (sharp) sign. As a result, we should have the entry “&[Page]” on the right.

Press "OK" twice. This will change the page view mode to Page Layout.
![]()
To return to normal mode, you can click on the "Normal" command, which is located to the left.
In the "Page Layout" mode, you can change and edit the headers and footers (color, font, size). In addition to page numbers, you can insert the date, author, and so on into the headers and footers.
Let's see how our header and footer - pagination will look like when the document is printed. To do this, press "Ctrl" + "P" - this is an analogue of the "Print" command, and select "View" there.
Now we see that page numbering has appeared at the very bottom of the page in Excel.
So we figured out how to number pages in Excel.
Laboratory and practical work No. 25 Microsoft Word. "Pagination. Printing a finished document»
Having studied this topic, you will learn:
What is a header and footer and how pages are numbered
How to preview a document before printing
How to set print options for a finished document
If you have multiple pages, you can create their numbering. To do this, the menuInsert item must be selectedPage numbers... (Figure 1.) , then in the window specify the location of the number (bottom or top) and alignment (left, right, center, inside, outside). The last two alignments (inside and outside) are used when mirror margins are set for the page. You can also choose to display or not the number on the first page. By pressing the buttonFormat another window appears where you can set the number format ( Arabic numerals, letters or Latin numerals) and indicate which digit the numbering will start with. The numbering is displayed in the non-printing area of the page, so you don't have to worry about accidental deletion or misalignment.
Renumbering
To change the font and other numbering options, triple-click on the page number or in the menuView
select itemHeaders and footers (Fig. 2)
. After this action, the number will be in a frame that can be stretched, moved. Click the button to set the border and background color. . The number inside the frame can be selected as text and set the font, its color, size, style, and other parameters (rice. 3
). On the tabPaper source
choose buttonBorders (Fig. 4).
Using this panel, you can switch between the bottom and header, move to the next, return to the previous.
Inserting page numbers
– carries out automatic numbering pages. In this case, it is possible to select the numbering format.
date and time
- insert current date and time, and with each subsequent opening of the document, these values will change accordingly.
To remove page numbering, highlight the number as described earlier and press the keyDelete . The numbering will be removed on all pages of the same section.
Printing a finished document
The finished document can be printed on a printer. But before that, it is desirablelook how he willto look like on print. You can switch to this mode using the menuFile - Preview or press the button is to view the file onscreen inform in which he willprinted . When you turn on the view, a toolbar appears:
One page
- showingcurrent
pages.
Multiple pages
- showingseveral
pages. To indicatequantity
it is necessary to allocatein the grid
required number of pages.
Page Fit - Reduction
document to one page to prevent a small piece of text from falling onto the last page.
After previewing, you can make adjustments to the text if necessary. The next step -seal
.
Printer selection
In the windowSeal
you need to configure the following settings.
If it is possible to select a printer, then in the areaPrinter
in the drop down listName
select the type of printer you are using.
Specify the print range in the areaPages
. The pages to be printed can be specified in several ways:

All - print all pages of the document.
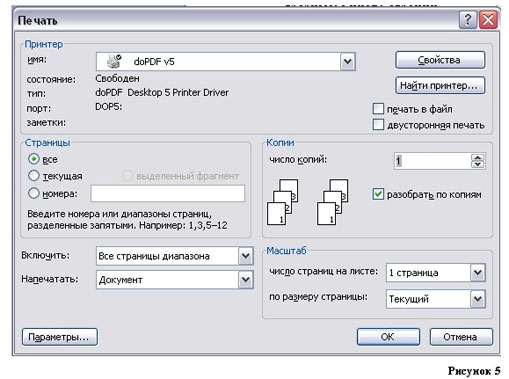
Current
- prints the page where the cursor is located.
Rooms
- print the specified pages. You can list them separated by commas, such as 1, 6, 8, 10 (first, sixth, eighth, tenth) or a range of pages, such as 12 - 22, 25 - 27 (twelfth to twenty-second and twenty-fifth to twenty-seventh).
Selection
- printing of the part of the document that is selected.
Number of copies
Enter the number of copies in the fieldNumber of copies
. There is also a checkbox here.collate into copies
. It is set by default; this means that all pages of the first copy will be printed first, then all pages of the second, and so on. Clearing the check box will print all copies of the first page first, then all copies of the second, third, and so on.
Specify additional options
Turn on
- in this list, you can select all pages, even or odd. Printing on even/odd pages is convenient when the document is divided into even/odd pages, respectively, and the text is located on both sides of the sheet.
In the area ofScale
on the listnumber of pages per sheet:
You can specify the number of pages printed on each sheet of paper. Listedfit to page
you can change the sheet format.
When checking the boxTwo-sided printing
you can print on a printer that does not support duplex printing. After all the sheets are printed on one side, you need to turn them over and insert them into the printer again.
Open the multipage document we will be working with(My documents - Didactics - Text_editor - The impact of a computer on human health. doc).
Number the pages of the document: the number is located in the center at the bottom, the color of the number is green, the background fill is light yellow, the font is Arial Black, the size is 12 pt.
Switch to the footer: Enter your full name. Right alignment, font - Arial Black, size - 12 pt, text color - red, background - light yellow.
Adjust the pages so that the last page does not have 5 lines.
Print only the even-numbered pages of the document on the network printer in the office.


